Who doesn’t love the irresistible aroma of freshly baked Garlic Swirl Rolls wafting through the house? There’s something truly magical about biting into a soft, warm roll filled with savory garlic and creamy goodness. Whether you’re serving them as a comforting side dish or elevating your dinner table with a touch of elegance, these rolls are sure to impress.
In this recipe, I’ll guide you step-by-step to create perfectly golden, flaky swirls that will have everyone asking for seconds. Trust me, once you master this simple yet stunning recipe, garlic bread will never look the same again! Let’s get started, shall we?
Key Benefits of Making Garlic Swirl Rolls at Home
There’s nothing quite like the satisfaction of pulling a batch of freshly baked Garlic Swirl Rolls out of the oven. But why should you make them from scratch? Here are a few reasons to convince you:
- Control Over Ingredients : By making these rolls yourself, you can choose high-quality, fresh ingredients and even tweak the recipe to suit your taste—more garlic, anyone?
- Nutritional Boost : While still indulgent, homemade swirl rolls allow you to add wholesome elements like whole wheat flour or reduce unnecessary fats for a slightly healthier twist.
- Versatility in Meals : These rolls aren’t just for dinner—they’re perfect for breakfast sandwiches, as a side for soups, or even as part of a festive brunch spread.
- Cost-Effective : Store-bought versions may seem convenient, but they often come with added preservatives and higher prices. Making your own saves money and ensures freshness.
Did you know that baking bread at home can also be incredibly therapeutic? The process of kneading dough and watching it rise is meditative, offering a break from the hustle and bustle of daily life. Plus, there’s no denying the pride that comes with serving something you’ve made entirely on your own. Ready to experience it for yourself? Let’s dive into the ingredients!
Ingredients You’ll Need
Gathering the right ingredients is the first step to creating delicious Garlic Swirl Rolls. Don’t worry—most of these are pantry staples, so you likely already have them on hand! Here’s what you’ll need:
- 3 cups all-purpose flour : This forms the base of your dough and ensures a soft, fluffy texture.
- 1 packet (2 ¼ teaspoons) active dry yeast : The star that makes your rolls rise beautifully.
- 1 cup warm milk : Not too hot, not too cold—think lukewarm. It activates the yeast and keeps the dough moist.
- ½ cup unsalted butter : Melted for the dough and softened for the garlic filling. Butter equals flavor in this recipe!
- 2 tablespoons granulated sugar : Just enough sweetness to balance out the savory garlic.
- 2 large eggs : One goes into the dough, and one is reserved for an egg wash later.
- 3 cloves garlic, minced or powdered : Fresh garlic adds depth, but powdered works in a pinch if you’re short on time.
- 1 teaspoon salt : Essential for enhancing all the other flavors.
- Optional : A sprinkle of dried herbs like parsley or oregano for extra aroma and color.

Before we begin, here’s a quick tip: Measure your ingredients accurately using measuring cups or a kitchen scale. Precision is key when working with yeast-based recipes. Now that we’ve got everything ready, let’s move on to the fun part—making the dough!
Instructions for Making Garlic Swirl Rolls
Now that you’ve gathered all your ingredients, it’s time to bring these Garlic Swirl Rolls to life! Follow these simple steps for perfectly golden, flavorful rolls every time:
Step 1: Activate the Yeast
- In a small bowl, combine the warm milk (around 110°F or lukewarm), 1 tablespoon of sugar, and the yeast. Stir gently and let it sit for about 5–7 minutes until it becomes frothy. This step ensures your yeast is active and ready to work its magic.
Step 2: Mix the Dough
- In a large mixing bowl, whisk together the flour, remaining sugar, salt, and one egg. Gradually add in the melted butter and yeast mixture, stirring until a dough forms.
- Knead the dough on a floured surface for about 8–10 minutes until smooth and elastic. If the dough feels too sticky, add a little more flour; if it’s too dry, sprinkle in a bit of water.
Step 3: Let It Rise
- Place the kneaded dough in a lightly greased bowl, cover it with a clean kitchen towel, and let it rise in a warm, draft-free spot for about 1 hour, or until it doubles in size. Pro tip: Preheat your oven to its lowest setting, turn it off, and place the bowl inside for an ideal rising environment.
Step 4: Prepare the Filling
- While the dough rises, mix softened butter with minced garlic (and optional herbs) in a small bowl. Set aside for later use.
Step 5: Shape the Swirls
- Once the dough has risen, punch it down to release any air bubbles. Roll it out into a large rectangle on a floured surface, about ¼ inch thick.
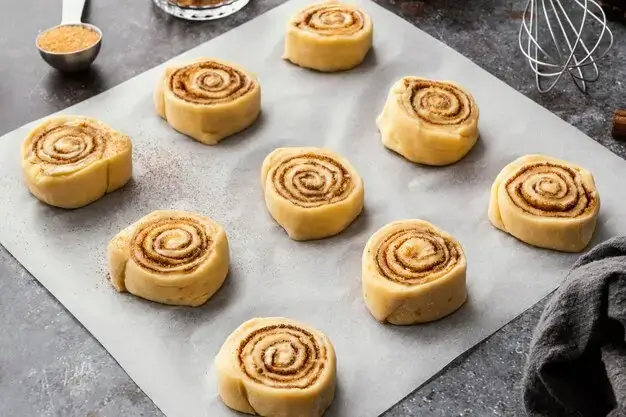
- Spread the garlic butter evenly over the dough, leaving a small border around the edges. Starting from the longer side, tightly roll up the dough like a jelly roll.
- Slice the rolled dough into 1-inch pieces and arrange them swirl-side up in a greased baking dish.
Step 6: Bake to Perfection
- Cover the shaped rolls with the towel again and let them rise for another 20–30 minutes. Preheat your oven to 375°F (190°C).
- Beat the reserved egg with a splash of water to create an egg wash. Brush this over the tops of the rolls for a golden sheen.
- Bake for 18–22 minutes, or until the rolls are golden brown and smell irresistible.
And there you have it—soft, garlicky swirls ready to steal the show at your next meal! Now, let’s explore some pro tips to take your rolls to the next level.
Pro Tips and Variations for Your Garlic Swirl Rolls
Now that you’ve mastered the basics, let’s dive into some expert tips and creative variations to make your Garlic Swirl Rolls even more impressive. Whether you’re a seasoned baker or just starting out, these ideas will help you elevate your rolls to new heights!
Pro Tips for Success:
- Perfect Proofing : If your dough isn’t rising as expected, try increasing the warmth of your kitchen by placing the bowl near a radiator or in an oven with only the light on. Consistent warmth is key!
- Fresh vs. Powdered Garlic : While fresh garlic adds bold flavor, powdered garlic works well if you’re short on time. Use about ¼ teaspoon of powdered garlic for every clove called for in the recipe.
- Freezing Made Easy : Once baked, allow the rolls to cool completely, then wrap them individually in plastic wrap and store in a freezer-safe bag. Reheat in the oven or microwave whenever you’re ready for a fresh batch.
Creative Variations:
- Herbaceous Twist : Add chopped fresh herbs like parsley, oregano, or thyme to the garlic butter filling for a burst of aromatic flavor.
- Cheesy Delight : Sprinkle shredded Parmesan, cheddar, or mozzarella over the garlic butter before rolling up the dough for extra richness.
- Gluten-Free Option : Swap all-purpose flour with a gluten-free baking blend and adjust liquid content slightly if needed. This way, everyone can enjoy these delicious rolls!
Common Pitfalls to Avoid:
- Over-kneading the dough can lead to tough rolls. Stop kneading once the dough feels smooth and elastic.
- Skimping on the rising time may result in dense swirls. Be patient—letting the dough rise fully ensures lightness and fluffiness.

Serving Suggestions for Your Garlic Swirl Rolls
Now that your Garlic Swirl Rolls are baked to golden perfection, it’s time to think about how to serve them. These versatile rolls can complement a wide range of dishes or even stand alone as the star of the show. Here are some delicious ideas to inspire you:
Pair with Savory Dishes:
- Hearty Soups and Stews : Serve alongside classics like creamy tomato soup, beef stew, or chicken noodle soup for a comforting meal.
- Roasted Meats : Pair with roasted chicken, turkey, or prime rib for an elevated dinner experience. The garlic flavor in the rolls enhances the richness of these dishes.
Perfect for Breakfast or Brunch:
- Eggs Benedict Twist : Use the rolls as a base for mini Eggs Benedict by splitting them open and topping with poached eggs and hollandaise sauce.
- Breakfast Sandwiches : Fill the rolls with scrambled eggs, bacon, or sausage for a hearty morning treat.
Festive Occasions:
- Holiday Spreads : Impress family and friends during special occasions by serving these swirls warm with butter or honey drizzled on top.
- Appetizer Platters : Cut the rolls into smaller pieces and arrange them on a platter with dips like garlic aioli, marinara, or herbed cream cheese.
Standalone Enjoyment:
- Warm and Simple : Sometimes, the best way to enjoy Garlic Swirl Rolls is straight out of the oven, slathered with extra butter or dipped in olive oil.
Fun Ideas for Kids:
- Mini Roll Pizzas : Top bite-sized rolls with marinara sauce, cheese, and toppings for a fun twist on pizza night.
- Dip Stations : Set up a DIY dipping station with ranch, BBQ, or melted cheese for interactive family meals.
Why You’ll Love These Garlic Swirl Rolls
There’s something truly magical about the combination of warm, soft bread and aromatic garlic—and these Garlic Swirl Rolls capture that magic perfectly. From the first step of kneading the dough to the final golden bake, this recipe is a journey worth taking. Not only do these rolls taste incredible, but they also bring a sense of accomplishment and joy to your kitchen.
Whether you’re serving them as part of a cozy family dinner, impressing guests at a special occasion, or simply treating yourself to a comforting snack, these swirls are sure to become a staple in your repertoire. Plus, with the flexibility to add herbs, cheese, or even freeze for later, the possibilities are endless!
So go ahead, roll up your sleeves, and give this recipe a try. Once you experience the satisfaction of pulling a tray of perfectly golden Garlic Swirl Rolls out of the oven, you’ll wonder why you ever bought pre-made ones. Happy baking, and don’t forget to savor every bite!
FAQs
Have some questions about making these Garlic Swirl Rolls? You’re not alone! Here are answers to the most common queries to help you bake with confidence.
1. Can I use almond milk instead of regular milk?
Absolutely! Almond milk or any plant-based milk can be used as a substitute. Just ensure it’s warm (not hot) when activating the yeast, as cooler temperatures might slow down the rising process.
2. How long can I store these rolls?
Store leftover rolls in an airtight container at room temperature for up to 3 days. For longer storage, freeze them individually in plastic wrap and a freezer-safe bag for up to 3 months. Reheat in the oven or microwave for freshness.
3. What if my dough doesn’t rise properly?
If your dough isn’t rising, double-check the expiration date on your yeast—it could be inactive. Also, ensure the milk isn’t too hot, as this can kill the yeast. A warm, draft-free environment is key for successful proofing.
4. Is this recipe suitable for vegans?
Not in its current form, but you can make it vegan-friendly by using plant-based milk, vegan butter, and skipping the egg (or replacing it with flaxseed meal mixed with water). Adjustments may slightly affect texture, but they’ll still taste amazing!
5. Can I make the dough ahead of time?
Yes! Prepare the dough up to the first rise, then punch it down, shape it into a ball, and refrigerate overnight. The next day, let it come to room temperature before shaping and baking.
6. Why are my rolls dense instead of fluffy?
Over-kneading or under-proofing are common culprits. Be gentle with the dough after kneading, and give it ample time to rise. Patience pays off when it comes to baking bread!
7. How do I know if the rolls are done baking?
Yes! Prepare the dough up to the first rise, then punch it down, shape it into a ball, and refrigerate overnight. The next day, let it come to room temperature before shaping and baking.

Garlic Swirl Rolls
Ingredients
- 3 cups all-purpose flour
- 1 packet 2 ¼ teaspoons active dry yeast
- 1 cup warm milk
- ½ cup unsalted butter melted + softened for filling
- 2 tablespoons granulated sugar
- 2 large eggs
- 3 cloves garlic minced or powdered
- 1 teaspoon salt
- Optional: dried herbs like parsley oregano, or thyme
Instructions
- Activate the Yeast : In a small bowl, combine warm milk, 1 tablespoon of sugar, and yeast. Let it sit for 5–7 minutes until frothy.
- Mix the Dough : In a large mixing bowl, whisk together flour, remaining sugar, salt, and one egg. Gradually add melted butter and yeast mixture, kneading until smooth and elastic (8–10 minutes).
- Let It Rise : Place dough in a greased bowl, cover with a towel, and let it rise for about 1 hour or until doubled in size.
- Prepare the Filling : Mix softened butter with minced garlic (and optional herbs). Set aside.
- Shape the Swirls : Roll out dough into a rectangle, spread garlic butter evenly, roll tightly, and slice into 1-inch pieces. Arrange swirl-side up in a greased baking dish.
- Second Rise : Cover rolls and let them rise again for 20–30 minutes. Preheat oven to 375°F (190°C).
- Bake : Brush tops with an egg wash and bake for 18–22 minutes until golden brown. Serve warm.
Notes
Pros
- Soft and fluffy texture with a rich garlic flavor.
- Versatile—can be served as a side dish, appetizer, or brunch item.
- Freezable for future use; convenient for meal prep.
- Customizable with cheese, herbs, or gluten-free alternatives.
- Perfect for holidays, family gatherings, or casual dinners.
Cons
- Requires time for dough to rise (not ideal for quick meals).
- Yeast-based recipes can be finicky if not handled properly.
- May require practice to achieve perfect swirls.
Looking for more ?
- https://www.rightyrecipes.com/garlic-chicken-wraps/
- https://www.rightyrecipes.com/taco-meat/
- https://www.rightyrecipes.com/chicken-parmesan-pasta/
Did you make this recipe?
Want more delicious recipes like this?
Click here to Follow me on Pinterest

