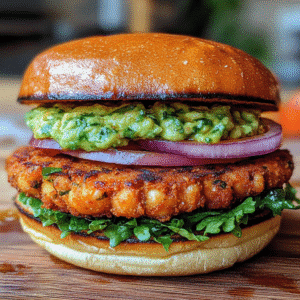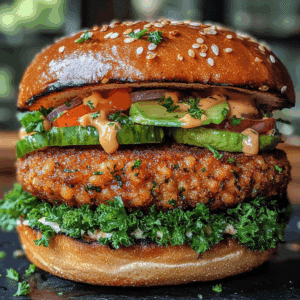
Oh my goodness, let me tell you about the first time I made these fluffy artisan burger buns! It was a sunny Saturday afternoon, and I was all geared up for a backyard barbecue. I had my gourmet burger patties ready, but I knew I needed something special to elevate the whole experience. After scouring through countless recipes, I stumbled upon this one. Trust me, after making these burger buns just a handful of times, I’ve become known among my friends and family as the “Bun Queen!” Seriously, every single time I whip these up, they disappear faster than you can say “grill master.” If you want to impress your guests and take your grilling game to a whole new level, you’ve got to try these! Let’s dive right in!
Why You’ll Love This Fluffy Artisan Burger Buns Recipe
- Incredible Texture: These buns are soft, fluffy, and delightfully chewy. They’re the perfect vessel for your burger creations.
- Easy to Make: Don’t let the artisan title fool you; this recipe is simple and straightforward, even for beginners!
- Versatile: You can customize them with different flavors and toppings, making them suitable for any occasion.
- Make-Ahead Convenience: You can prepare these buns in advance and freeze them, ensuring you’re always ready for impromptu grilling sessions.
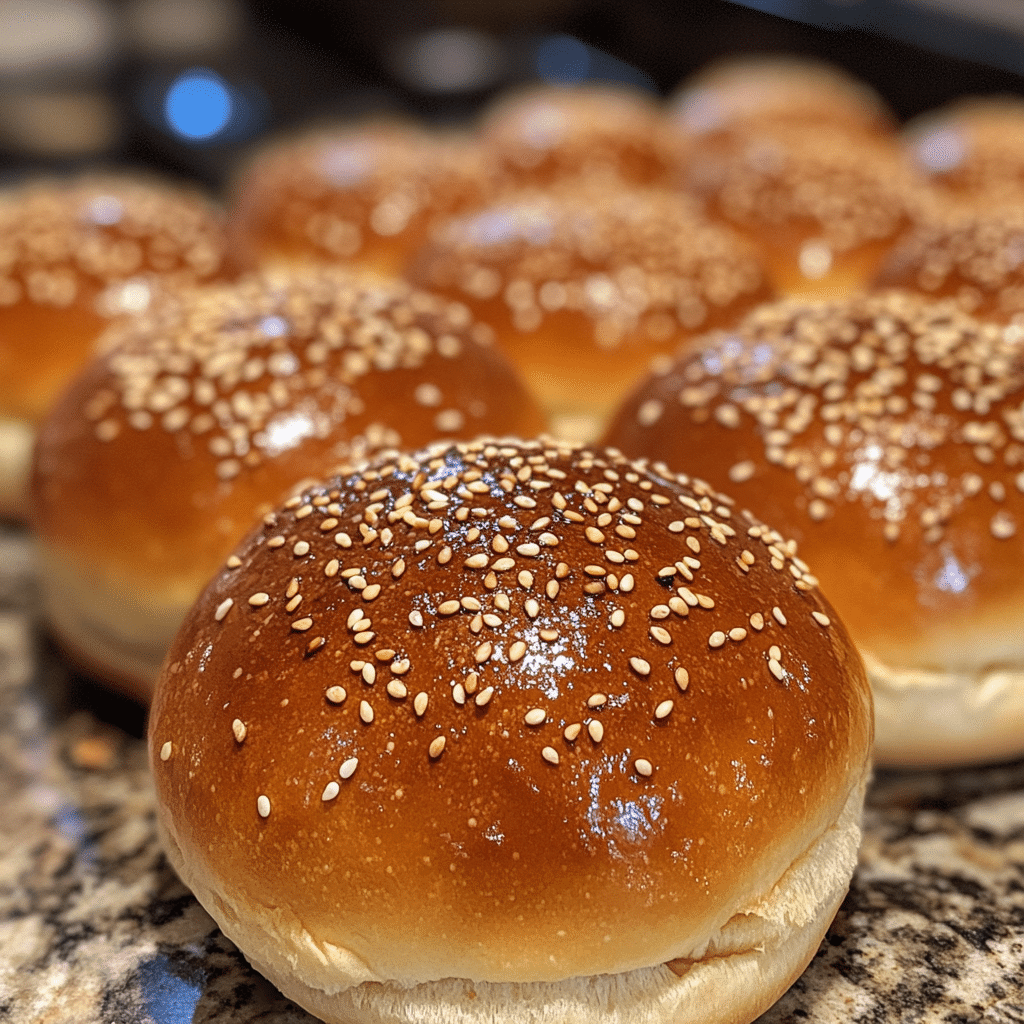
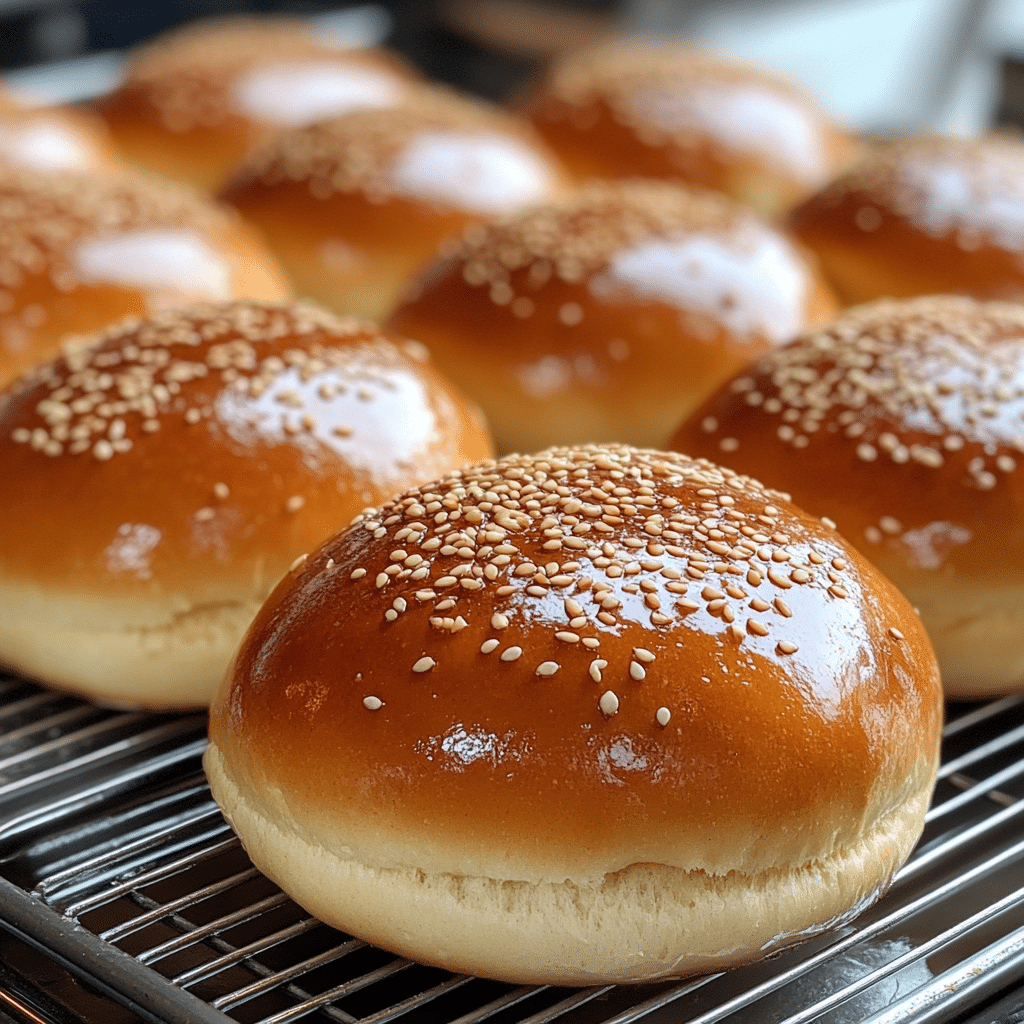
- Impressive Presentation: These buns look as good as they taste, with a golden-brown crust that will wow your guests.
The Secret to Perfect Fluffy Artisan Burger Buns
The secret to these buns lies in a few key ingredients and techniques. First off, the use of bread flour instead of all-purpose flour gives the buns that delightful chewiness and structure. Additionally, the combination of milk and butter creates a rich flavor and soft texture. One of my favorite insider tips? Let the dough rise in a warm place. This will help it become airy and light. Don’t be intimidated by the rising times; trust me, it’s worth the wait!
Rave Reviews from Friends and Followers
“These buns are a game-changer! I can’t believe I ever bought store-bought. My burgers have never tasted better!” – Sarah J.
“I made these for a family gathering, and everyone raved about them. They’re now a staple at our BBQs!” – Mark T.
“I was shocked at how easy these were to make! They turned out perfectly and looked so professional.” – Emily R.
Creative Variations to Try
- Herbed Buns: Add dried herbs like rosemary or thyme to the dough for an aromatic twist.
- Garlic Butter Buns: Brush the tops with melted garlic butter before baking for a savory kick.
- Cheese-Stuffed Buns: Incorporate your favorite cheese into the center of the dough before shaping for a gooey surprise!
- Whole Wheat Buns: Substitute half of the bread flour with whole wheat flour for a healthier option.
Bonus: Try adding a sprinkle of sesame seeds or poppy seeds on top before baking for an extra crunch and flavor.
FAQs – All Your Questions Answered!
Can I use all-purpose flour instead of bread flour? Yes, but the texture may be slightly less chewy. Bread flour gives the best results.
How should I store leftover buns? Store them in an airtight container at room temperature for up to 2 days, or freeze them for up to 3 months.
Can I make the dough ahead of time? Absolutely! You can make the dough, let it rise, shape the buns, and then refrigerate them for up to 24 hours before baking.
What should I do if my dough isn’t rising? Make sure your yeast is fresh and that you’re letting the dough rise in a warm, draft-free spot.
Storage/Serving Tips
- Store baked buns in an airtight container at room temperature for up to 2 days.
- For longer storage, freeze the buns by wrapping them individually in plastic wrap and then placing them in a freezer-safe bag.
- Serve these buns warm, lightly toasted, or at room temperature with your favorite burgers and toppings.
Perfect Occasions for Fluffy Artisan Burger Buns
- Summer BBQs with friends and family
- Birthday parties where gourmet burgers are a hit
- Game day gatherings with hearty toppings
- Casual weeknight dinners to elevate homemade burgers
- Picnics in the park with delicious, portable sandwiches
The Complete Recipe
Thank you for sticking with me through all this deliciousness! Now, let’s get to the moment you’ve been waiting for: the recipe for these fluffy artisan burger buns!
Fluffy Artisan Burger Buns
Ingredients
- 4 cups bread flour
- 1 packet (2 1/4 teaspoons) active dry yeast
- 1/4 cup granulated sugar
- 1 teaspoon salt
- 1 cup whole milk, warmed
- 1/4 cup unsalted butter, melted
- 1 large egg
- 1 tablespoon sesame seeds (optional)
Tip: Make sure your milk is warm (about 110°F) to activate the yeast effectively. If it’s too hot, it can kill the yeast. If too cold, the dough won’t rise properly.
Extend ingredients section: You can experiment with different types of milk like almond or oat milk for a dairy-free option. You can also replace the butter with olive oil for a healthier alternative. Just remember that each ingredient adds its unique flavor and texture, so choose wisely!
Step-by-Step Instructions
Step 1: Activate the Yeast
In a small bowl, combine the warmed milk, sugar, and yeast. Let it sit for about 5-10 minutes until it’s frothy. This means your yeast is active and ready to work its magic!
Step 2: Mix the Dry Ingredients
In a large mixing bowl, whisk together the bread flour and salt. This ensures that the salt is evenly distributed, which is crucial for flavor.
Step 3: Combine Wet and Dry Ingredients
Pour the yeast mixture into the flour mixture, followed by the melted butter and egg. Use a wooden spoon to mix until a dough forms. It will be slightly sticky, but that’s a good sign!
Step 4: Knead the Dough
Turn the dough onto a floured surface and knead for about 8-10 minutes until it’s smooth and elastic. This step is essential for developing the gluten, which gives the buns their structure.
Step 5: First Rise
Place the dough in a greased bowl, cover it with a damp cloth, and let it rise in a warm place for about 1-2 hours, or until doubled in size. Go ahead and enjoy the delightful smell of rising dough!
Step 6: Shape the Buns
After the dough has risen, punch it down gently to release the air. Divide it into 8 equal pieces and shape each piece into a round bun. Place them on a lined baking sheet, ensuring they have space to expand.
Step 7: Second Rise
Cover the buns again and let them rise for another 30-45 minutes until puffy. This is where the magic happens, so be patient!
Step 8: Preheat and Bake
Preheat your oven to 375°F (190°C). If you want to add sesame seeds, sprinkle them on top just before baking. Bake the buns for 15-20 minutes or until they’re golden brown. The smell will be absolutely heavenly!
Step 9: Cool and Enjoy
Let the buns cool on a wire rack before slicing. This will keep them from getting soggy when you add your burger patties. Enjoy the satisfaction of presenting your homemade buns!
Nutritional Information: Each bun contains approximately 200 calories,